 Ok, I’m hardly a ‘boss’.
But bear with me for a second.
A little while ago I started producing seriously long blog content… 4,000 words, 5,000 words, even a couple of posts that cracked 7,000 words!
It became obsessive – this was my strategy to go from unknown, to respected and noteworthy.
But there was a problem. I began setting an expectation with you, an expectation that long posts were the norm. On the surface this was great, people were liking the depth and quality of my posts. But underneath this facade was chaos. The world saw me as a duck floating seamlessly down a stream, whilst under the water I was paddling harder than I’ve ever paddled.
Burnout was on the horizon.
My challenge: How to write blog content in less time – without giving up on quality.
I had a choice to make – find a way to solve this dilemma, or wither away into the distance with every other failed blogger…
I chose to immerse myself in the problem. Shifting my mindset from victim to owner. From impossible to… ‘There has to be a way’.
Turns out there is no universal way to solve this – and I’m only part the way along the journey myself. So I’m not promising you a magic pill, or an overnight shortcut. But what I will show you is a process that will save you time and help you write great blog content more consistently.
For the moment I’ve avoided burnout, maintained high quality content, and managed to produce it more regularly.
Here’s how you can do the same.
Contents
Setting yourself up for success
Shake ‘N’ Bake Writing Process
Step 1 – Idea + Headline (5 min)
Step 2 – Initial Research + Long-tail Keywords (5-10 min)
Step 4 – Bake (1 hr per 1,000 words)
Step 5 – Edit + Add Images (30 min – 1hr)
Step 6 – Add Meta Data + Optimize for Search Engines (15 min)
Setting yourself up for success
Before we jump into the process for writing great blog posts, there are a few things you will need to do to increase your chance of success. By success I mean more content in less time, without giving up on quality.
To set yourself up for success;
Create a repeatable writing process
Define the exact steps it takes for you to write a blog post – from start to finish. How can you break this process down into smaller components that add up to the end result? How long does it take to complete each component within this process?
I will discuss the 5-step writing process I use in more detail in a moment – you can use it as a guide by downloading the ‘Write Like a Boss Bundle’.
In reality though, you will need to find a writing process that suits your style so you can tweak and refine it over time.
Have a consistent template and checklist
As well as your writing process, if you want to write better content in less time, you will need a blog post template and checklist. These two things act as a structure for writing consistently quality content – helping you get there in less time over and over again.
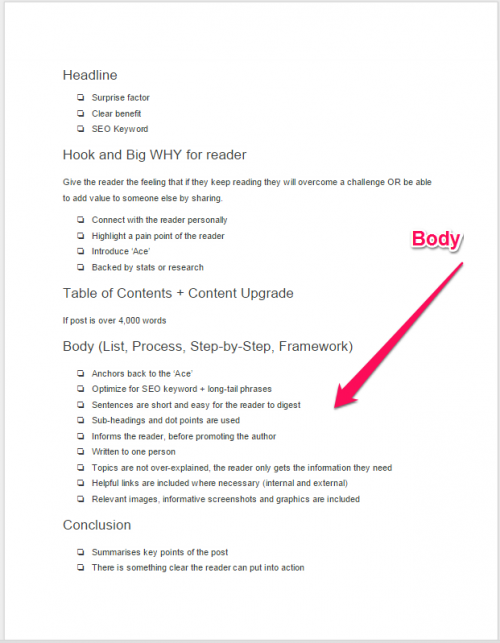
The template will sit within the platform you choose to write your content – for me this is Google Docs. Every time you go to write a new post, create a copy of your generic blog post template document as a starting point. This helps think about where to start, and what information you will need to gather to write the post itself.
See a screenshot of my generic Google Docs template below (This is a replica of the ‘Blog Post Writing Template’ in the download for this post);
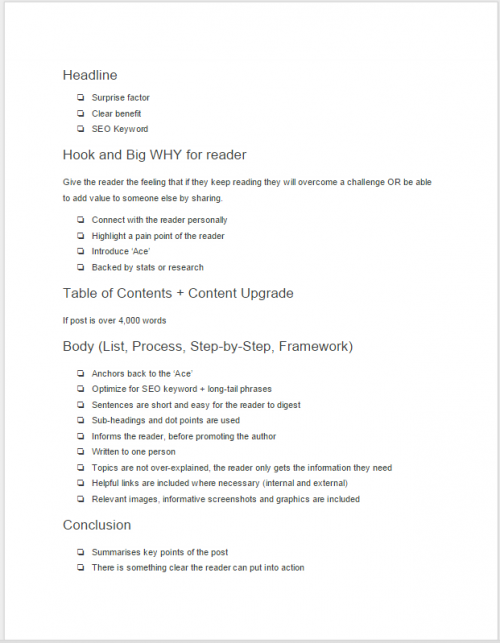
The checklist works a little differently. It is a tangible alternative to the template, that reminds us of what components each part of the blog post should include.
For example, when I have a draft of my blog post written in Google Docs, I print off a version of the blog post checklist and work my way through from introduction to conclusion – ticking off the things I have outlined as important for each section. You would be surprised how often it jogs the memory and helps improve the quality of the post ever-so slightly.
The ‘Blog Post Writing Template’ and ‘Blog Post Checklist’ are available in the ‘Write Like a Boss Bundle’.
Remove all distractions
One of the most important parts of this writing process is making it a habit – something that is embedded in your day-to-day life.
But having a habit isn’t enough in itself, this habit needs to be productive and dedicated to one specific task – writing.
Pick a time slot in your calendar every day, or every week, that is dedicated to writing. Then initiate a string of symbols.
Turn off your phone. Switch off email notifications. Shutdown your internet browser. Eliminate any clutter at your work station. Make it clear to everyone who could possibly distract you that you have an important task to do – don’t accept disruptions unless they are genuinely urgent.
And then, the most important of all. Start writing. Don’t stop until your allotted time is up. I don’t care if you THINK you have writer’s block, or what you are writing makes you want to cringe. I cringe all the time at what I put down in a first draft – but it is an essential part of the process.
The more you break this barrier and just get in there and do it, the more you will write, and the better you will get at accomplishing the things you want to with your blog.
Remember this success factor during Step 4 of the Shake ‘N’ Bake Writing Process.
Get accountability and motivation
Now that you have a process for writing, and a way to govern the quality of your writing, the next step is to get the juices flowing with some motivation. This is the final part of setting yourself up for success.
There are two tactics I use to increase the chance of actually going through with the writing process and both of them involve some form of accountability.
The first is to make it a challenge for yourself. Goals are important, but I’ve found that an even more powerful accompaniment to a goal is to turn that goal into a challenge or competition – even if it is with yourself. For example, I set myself a challenge on the 16th of April to write 30,000 words in 30 days. Before writing this post I was up to 12,719 words – a little bit behind schedule, but not far from where I need to be. And to be honest, probably a lot more than I would have written otherwise.
The second part of attracting motivation is to bring other people with you to scale up external accountability. A goal or challenge is very easy to push to one side if you don’t tell anyone, but as soon as those words come out of your mouth you have something much bigger on the line – your pride. At the most basic level you can tell a couple of close friends or colleagues about your challenge – asking them to keep track of your progress along the way. Alternatively if you don’t have a challenge and you want to enlist external accountability, you can give others access to your editorial calendar or commit to writing guest posts ahead of time.
Commitments to other people accelerate your journey towards a goal because no longer are you just letting yourself down if you pull up short or quit – others are involved.
If you didn’t notice, I just made an even bigger commitment. Anyone that reads this blog post now knows about my 30-day challenge… There is nowhere to hide now!
Shake ‘N’ Bake Writing Process (Step-by-Step)
Now for the fun stuff.
I want to bring you into my world for a moment and unveil the exact process I use every time I write a blog post. If you are looking to create a repeatable writing process yourself, this may be a helpful start.
I call this Shake ‘N’ Bake – partly because I love the movie Talladega Nights with Will Ferrell and John C Reilly, and partly because the metaphor helps me visualize the process!
I have broken each step down and estimated how long it takes. This allows you to batch the tasks and do them when you have spare capacity – or alternatively schedule them into the diary. For example, you might have 35 minutes free – this may feel like too little time to write a blog post. But with this writing process, you could use that time effectively to come up with an idea, craft a headline, research for the post and structure your thoughts. That way when you sit down to actually write, you won’t be starting from scratch.
Here is how the process works…
Step 1 – Idea + Headline (5 Minutes)
Coming up with ideas to write about can be tedious and often the most frustrating part about blogging. To combat this challenge, being prepared is essential.
Instead of coming up with a new blog post ideas every time you sit down to write, try and backlog them in an editorial calendar, spreadsheet or some other place you capture notes. But most importantly, be deliberate about the ideas you will write about in the future.
For example, what keywords are you targeting on your site? What blog posts can you write that will complement those keywords?
The actual idea generation part of blogging is not part of this writing process – at this stage you are purely grabbing a pre-prepared idea and its associated keyword from your editorial calendar or content strategy spreadsheet. (I’ll save that process for another post – today lets concentrate on writing better content).
Once you have your idea and relevant keyword – hopefully you picked one with decent search volume – put together 4 or 5 headline options.
Don’t obsess over the headline at this stage, we will come back and edit it later.
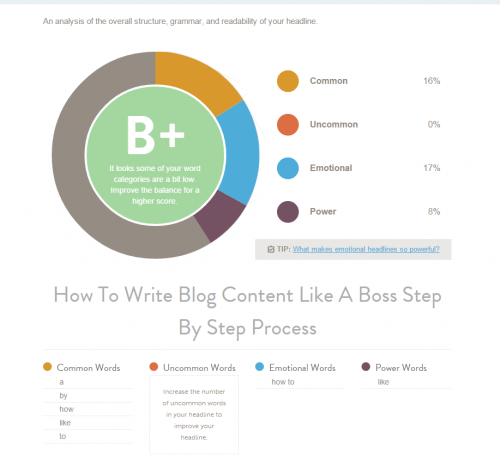
But if you are stuck for ideas, try using CoSchedule’s Headline Analyzer – you will see below the feedback it has given me for this post.
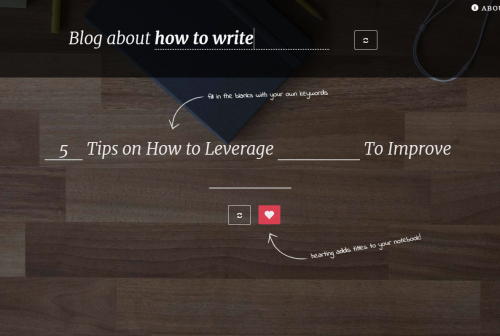
Or Impact Inbound’s Blog Title Generator…
This step in the writing process shouldn’t take you longer than 5 minutes if you have done the work up front to research keywords and blog post ideas.
Step 2 – Initial Research + Long-Tail Keywords (5-10 Minutes)
Once you have your blog post topic and a general idea of the headline, it’s time to start researching your blog post.
Start by opening up your document where you have stored your blog post template – for me this is in Google Docs.
Now, grab your keyword and head over to Google. For the purpose of this exercise, lets use the keyword phrase ‘how to write blog content’ which I have optimized this post for.

Click on any of the articles on page 1 and 2 of the search that sound interesting – or are written by a reputable source.
Copy and paste these articles into the ‘SERP’ section of your blog post template. (SERP stands for ‘Search Engine Results Page’)
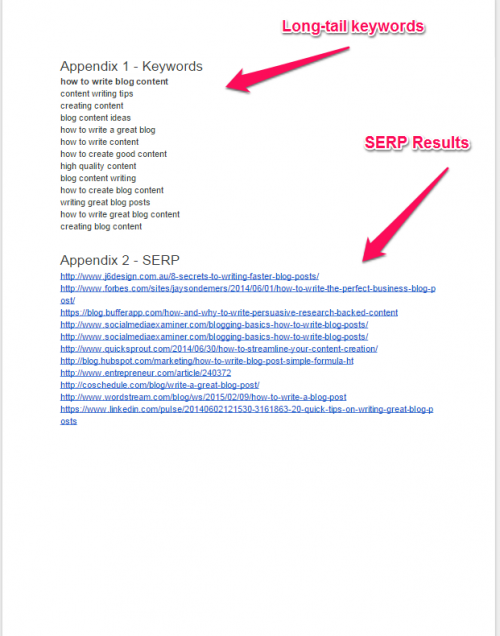
Don’t worry about reading the articles for now, that comes in the next step.
The other thing you want to research and capture at this stage are some long-tail keyword phrases. These are extended versions or related terms to your chosen keyword. You can find these at the bottom of a Google search…

Or using KWFinder.com…

Drop a small group of relevant long-tail phrases into your blog post template in the ‘Keywords’ section. We will use these later on in the writing process.
Finding a few relevant articles and associated keywords shouldn’t take you longer than 5-10 minutes.
Step 3 – Shake (30 Minutes)
This part of the process is all about finding all the best content already written (by you or anyone else) on the topic you are going to write about. Then, using that content to nut out a structure for your post.
Once you have a structure you are metaphorically ‘shaking’ the content into your blog post draft. (Don’t worry, this isn’t going to be plagiarism, I’ll address that later when we start baking)
Open up all of the article links you copied into your document in separate tabs in your browser.
Spend 5-10 minutes skim reading each of the articles – jotting down the key points and consistent themes across all of them on a piece of paper. (Don’t close the tabs just yet)
Summarize everything you have on your piece of paper into something that makes more sense – for example a list of key points or a step-by-step process. This will become your blog post structure in the form of headings and dot points.
Now audit your structure.
What is missing? What from your experience should be included in this topic but hasn’t yet been covered?
Once you have a final structure for your post, add it into your blank template.
For me this is within the ‘Body’ section of my Google Doc.
Now the shaking begins.
You have a set of headings or subheadings and are almost ready to start writing. But first, we want to capture all the best information we can on the topic from those articles you just found.
Go back to your tabs again where the articles are open and scan through each of them, looking for relevant information based on your set of headings and blog structure.
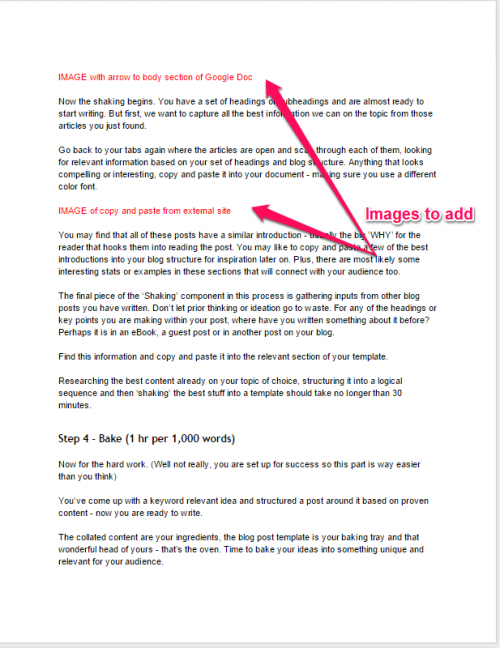
Anything that looks compelling or interesting, copy and paste it into your document – making sure you use a different color font.
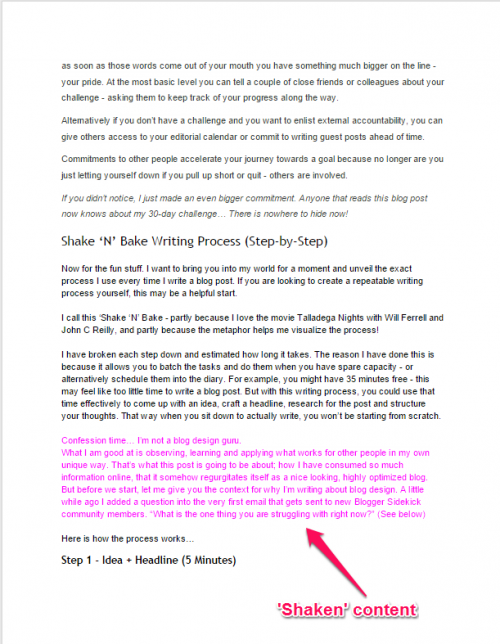
You will find that all of these posts have a similar introduction – usually the big ’WHY’ for the reader that hooks them into reading the post.
You may like to copy and paste a few of the best introductions into your blog structure for inspiration later on. Plus, there are most likely some interesting stats or examples in these sections that will connect with your audience too.
The final piece of the ‘Shaking’ component in this process is gathering inputs from other blog posts you have written. Don’t let prior thinking or ideation go to waste.
For any of the headings or key points you are making within your post, where have you written something about it before? Perhaps it is in an eBook, a guest post or in another post on your blog. Find this information and copy and paste it into the relevant section of your template.
Researching the best content already on your topic of choice, structuring it into a logical sequence and then ‘shaking’ the best stuff into a template should take no longer than 30 minutes.
Step 4 – Bake (1 hr per 1,000 words)
Now for the hard work. (Well not really, you are set up for success so this part is way easier than you think)
You’ve come up with a keyword relevant idea and structured a post around it based on proven content – now you are ready to write.
The collated content are your ingredients, the blog post template is your baking tray and that wonderful head of yours – that’s the oven. Time to bake your ideas into something unique and relevant for your audience.
Set yourself a timer – for however long you have available – and write without distraction. It doesn’t matter if it is only 15 minutes, now that you have broken up your blog post into sections you can easily write a section at a time without losing track of where you are.
During your allotted time don’t do anything else except write – don’t add links, obsess over examples or include images. You don’t want to break the flow.
For example, I will use red text as a placeholder every time I know I want to add a screenshot – then add all images in one batch later on.
Whatever you do DON’T PLAGIARISE. The content you have copied into each section of your blog structure from other authors is there for inspiration, not for you to claim as your own. Write everything in your own words. Take a unique standpoint and form an opinion about your topic.
This step of the process will take as long as you need it to. It is largely dependant on how many words you want to write and how in depth the topic you are covering is. But, if you genuinely practice what I’m talking about without any distractions – just writing – you should be able to write at least 1,000 words per hour.
Step 5 – Edit + Add Images (30 Minutes – 1 hr)
This is my least favourite step in the process.
You have written an epic post, well-researched and backed by your experience – that is an accomplishment.
But, your work is not done. In fact, what’s left can be very tedious and frustrating.
Once you have written your post – read it from start to finish and make some small edits where necessary, plus add in any relevant links you need to.
If you have downloaded the ‘Write Like a Boss Bundle’ this is where you would have the blog post checklist on your desk, ticking off everything that makes for a compelling article.
Take the post to your publishing platform
One of the reasons I use Google Docs is because it makes the transfer across into WordPress fairly seamless. (If you use a platform other than WordPress, this process is still pretty much the same)
Create a new post in WordPress and drop your chosen headline into the top bar plus your entire post into the main article area… links and all. (Make sure you are in ‘Visual Editor’ mode)
What you see at this stage will look pretty similar to the formatting you just had in your document. But if there are some minor glitches, like extra spaces or wonky font size, fix these up quickly.
Now, if you are anything like me you included a bunch of screenshots or images in your post. Add all of these into your post now.
Scroll down and stop every time you see a note to ‘Add an Image’ – hopefully you have been descriptive about what the image should look like, making it easy to jog your memory.
Use Skitch to capture the screenshot (or another snipping tool you prefer). The great thing about Skitch – apart from the fact that it is free and creates high quality images – is that you can easily add text, arrows, boxes or lines straight to your screenshot.
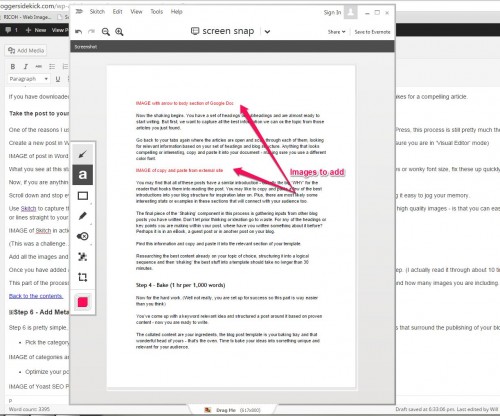
(This was a challenge… I had to figure out how to take a screenshot of a screenshot tool!)
Add all the images and make sure the text surrounding them makes sense, plus add descriptive alt tags. (This is important for SEO)
Once you have added all of your images, cleaned up the way your post looks and given it a final read through, you are ready to move onto the next step. (I actually read it through about 10 times, but I’m a perfectionist!)
This part of the process can be a little tedious, that’s why I’ve allotted between 30-60 minutes for it. But again, it will depend on how long your post is and how many images you are including.
Step 6 – Add Meta Data + Optimize for Search Engines (15 Minutes)
Step 6 is pretty simple, but it’s very important for the long-term viability of your blog.
When I say ‘Meta Data’ I am just referring to all the bits and pieces that surround the publishing of your blog. For example;
- Pick the category your blog post will be housed under and add relevant tags
- Optimize your post for search by adding a meta description and checking it passes with the Yoast SEO plugin.

- Go back to your list of long-tail keywords and see which ones will fit within your post – be careful not to stuff them in unnecessarily
This final part of admin shouldn’t take longer than 15 minutes.
Conclusion
Don’t let blog writing result in burnout – it doesn’t have to.
I made a choice to adopt a better way of doing things, and I hope you will do the same.
Even if you take one or two minor tips on how to write blog content from this post, I’ve done my job.
As I said, I’m not a ‘boss’ or ‘expert’ or any of that fancy stuff. I’m just a guy that loves blogging, and wants to share everything I learn with you.
That way, hopefully, you won’t make all the mistakes I have and everything will happen much faster.
Take what you’ve learnt from the Shake ‘N’ Bake Writing Process and apply it. Tell someone that you’re doing it.
Got no one to tell? Tell me. Email me directly and fess up to exactly what you’re committing to achieve.
There are tonnes of excuses for those of us that don’t want to sweat it out. And it is much easier to sit back and watch, than it is to knuckle down and show the world what you’ve got.
Perhaps it’s time we all got a little bit of Shake ‘N’ Bake in our life – I promise it’ll give you back the time you deserve, and more importantly help you write better content.
What challenge will you set for yourself?

